


PEDROFELES
Share
Regular price
Rs. 1,260
Sale price
Rs. 1,260
Regular price
Designer Safety Shoe
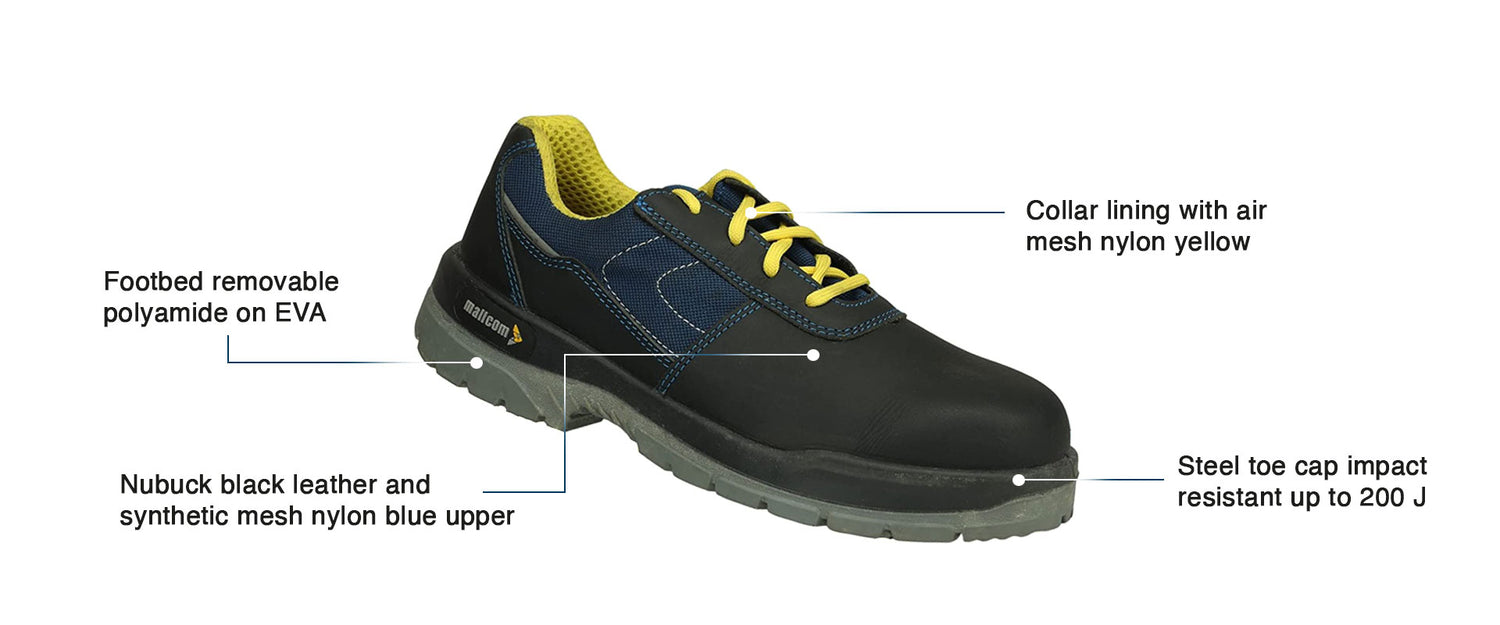
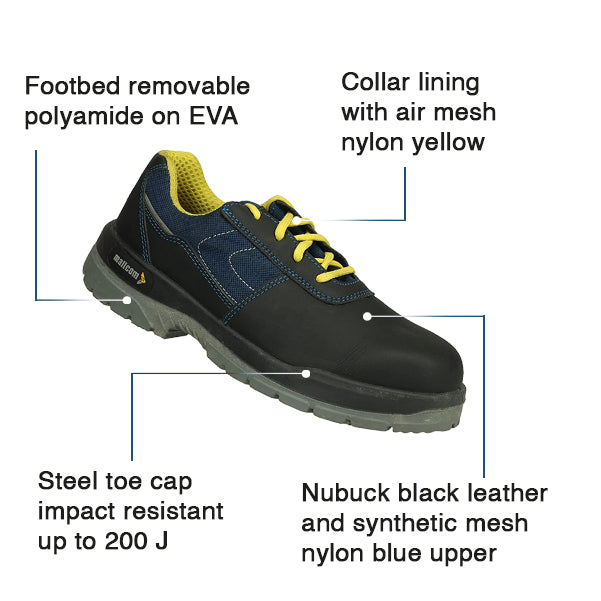
- Mallcom Pedrofeles Low Ankle Black Nubuck Leather & Synthetic Mesh Nylon Blue Upper Double Density Shoe
- Low ankle safety shoe with black nubuck leather upper
- Fastening is with aesthetically designed yellow lace
- 200 J impact-resistant steel toe cap
- Yellow spacer lining
- Double Density PU outsole
Oil Resistant
Slip Resistant
Anti-penetration
Impact Resistant
Select Size
View Size Chart
PEDROFELES

Size Chart
How to Measure
PEDROFELES
| UK Shoes Size | EU Shoes size |
|---|---|
| 4 | 37 |
| 5 | 38 |
| 6 | 39 |
| 7 | 41 |
| 8 | 42 |
| 9 | 43 |
| 10 | 44 |
| 11 | 46 |
| 12 | 47 |
PEDROFELES
For easy size conversions just look up your foot length in inches or cm in the table that has been provided.
Check COD Availability
Bulk Orders
For Bulk Orders, Fill out the enquiry form and someone from our team will get back to you as soon as possible.

Couldn't load pickup availability
EN 20345:2022
Delivery & Services

Easy Return
with our 15 days return poicy
Regular price
Rs. 1,260
Sale price
Rs. 1,260
Regular price


ABOUT THE DESIGN
USEFUL IN THESE INDUSTRIES
ELECTRONICS
HOSPITALITY
LOGISTICS
PHARMACEUTICAL

Items of safety footwear are fitted with toecaps designed to give protection against impact when tested at an energy level of at least 200 J and against compression when tested at a compression load of at least 15 kN. This test is incorporating a steel striker of mass 20 kg ± 0.2 kg adapted to fall freely on vertical guides from a predetermined height to give the required impact energy of (200 ± 4) J for safety footwear or (100 ± 2) J for protective footwear.
When footwear is tested in accordance with the force required to penetrate the sole unit shall be not less than 1100 N. The test includes the tests: placing the test piece on the base plate in such a way that the steel nail can penetrate it through the bottom, the nail against the sole unit at a speed of (10 ± 3) mm/min until the point has penetrated completely and measure the maximum force, carrying out the test at four different points on the sole unit (at least one in the heel region) with a minimum distance of 30 mm between any two penetration points and a minimum distance of 10 mm from the edge of the insole. For cleated soles, carry out the test between cleats. Two of the four measurements shall be made at a distance of 10 mm to 15 mm from the line represented by the feather edge of the last. Report the minimum value of the individual measurements as the test result.
When outsoles other than those from all-rubber or all-polymeric footwear are tested in accordance with the relative volume loss shall be not greater than 250 cu.mm for materials with a density of 0.9 g/cu.cm or less, and not greater than 150 cu.mm for materials with a density greater than 0.9 g/cu.cm.The test includes the steps: Placing the sole on the drilling machine such that the wearing surface of the sole faces the hollow drill. Slowly drill into the sample to procure a cylindrical test piece with a uniform diameter of 16+/-0.02 mm throughout the thickness, avoiding any tapering while sampling preparation. The cutting edge may be wetted with water containing wetting agent (detergent) to obtain the test piece.
When outsoles are tested in accordance with the cut growth shall be not greater than 4mm before 30000 flexes. The test includes: marking the longitudinal axis or flexing line of the footwear and removing the perpendicular line of one 1/3rd of its (flexing line) length, bottom of the footwear with the insole removing the complete upper is used as a test piece, after removal of the upper ensures that the entire surface of the bottom of the footwear is uniform along the edges. To avoid any stresses at raised positions, slight buffing may be done to ensure complete smoothness all along the margin, marking the center of flexing line and find two adjacent cleats that are as close as possible to the center of flexing line. Mark the sole midway between these cleats, bring the Bennewart flexor at the neutral flex position and clamp the test piece in such a manner that the flexing line is parallel with the central roller. Bring the machine to maximum stretched state by hand and make an incision at the point marked with the piercing tool, measuring the initial length of the cut using vernier calipers and magnifying glass, carrying out 30,000 flexes. After completion of 30,000 flexes measure the length of the cut in the same manner. On completion of the test, the testing device should not be left at the fully flexed position. Cut growth = Final cut length (mm) - Initial cut length (mm).
This test measures the force required to separate the upper (10 mm length range) from the outsole or to separate adjacent layers (10 mm length range) of the outsole or to cause tear failure of the upper or the sole by inserting a hot knife into the adhesive layer is measured in the tensile machine to record load/deformation graph at a jaw separation speed of (100 ± 20) mm/min.
When polyurethane outsoles and soles with an outer layer composed of polyurethane are tested in accordance with the cut growth shall be not greater than 6 mm before 150 000 flex cycles. Cut the test piece from the sole. If the thickness is more than 3 mm, reduce the thickness to 3+/-0.2 mm. Keep the sample in a desiccator containing water and place the test piece on a perforated plate. The test pieces should not come in contact with water directly at any point in time. Close the desiccator lid and keep the desiccator in the oven at 70°C for 7 days. After 7 days, take out the test piece and condition at 23°C for 24 hours. After 24 hours, perform the ross flex test maintaining the temperature at -5°C and measuring an initial length of the cut and then performing 1500 cycles and again measuring the final cut length. Cut growth = Final cut length (mm) – Initial cut length (mm).
The steps include: Cleaning the surface of the sole with ethanol, wash with distilled water on dry basis whereas followed by applying conductive lacquer on wet basis and dried at room temperature without buff or abrade the surface, conditioning at 20+/2°C and 30%+/-5% RH for 7 days in the climate chamber, filling with 4 kg of steel balls. If the height of the upper is not sufficient to hold 4kg balls, place the knee boot insulating upper in the shoe to extend the height of the upper, placing the filled specimen on the copper plate. Apply a test voltage of 100V (±2) for 1 minute and record the resistance.
¾ in a dry atmosphere, the electrical resistance shall be above 100 Kohm and less than or equal to 1000 Mohm. ¾ in a wet atmosphere, the electrical resistance shall be above 100 Kohm and less than or equal to 1000 Mohm.
Product Features
ABOUT THE DESIGN
USEFUL IN THESE INDUSTRIES
ELECTRONICS
HOSPITALITY
LOGISTICS
PHARMACEUTICAL
Product Details

Tests
Items of safety footwear are fitted with toecaps designed to give protection against impact when tested at an energy level of at least 200 J and against compression when tested at a compression load of at least 15 kN. This test is incorporating a steel striker of mass 20 kg ± 0.2 kg adapted to fall freely on vertical guides from a predetermined height to give the required impact energy of (200 ± 4) J for safety footwear or (100 ± 2) J for protective footwear.
When footwear is tested in accordance with the force required to penetrate the sole unit shall be not less than 1100 N. The test includes the tests: placing the test piece on the base plate in such a way that the steel nail can penetrate it through the bottom, the nail against the sole unit at a speed of (10 ± 3) mm/min until the point has penetrated completely and measure the maximum force, carrying out the test at four different points on the sole unit (at least one in the heel region) with a minimum distance of 30 mm between any two penetration points and a minimum distance of 10 mm from the edge of the insole. For cleated soles, carry out the test between cleats. Two of the four measurements shall be made at a distance of 10 mm to 15 mm from the line represented by the feather edge of the last. Report the minimum value of the individual measurements as the test result.
When outsoles other than those from all-rubber or all-polymeric footwear are tested in accordance with the relative volume loss shall be not greater than 250 cu.mm for materials with a density of 0.9 g/cu.cm or less, and not greater than 150 cu.mm for materials with a density greater than 0.9 g/cu.cm.The test includes the steps: Placing the sole on the drilling machine such that the wearing surface of the sole faces the hollow drill. Slowly drill into the sample to procure a cylindrical test piece with a uniform diameter of 16+/-0.02 mm throughout the thickness, avoiding any tapering while sampling preparation. The cutting edge may be wetted with water containing wetting agent (detergent) to obtain the test piece.
When outsoles are tested in accordance with the cut growth shall be not greater than 4mm before 30000 flexes. The test includes: marking the longitudinal axis or flexing line of the footwear and removing the perpendicular line of one 1/3rd of its (flexing line) length, bottom of the footwear with the insole removing the complete upper is used as a test piece, after removal of the upper ensures that the entire surface of the bottom of the footwear is uniform along the edges. To avoid any stresses at raised positions, slight buffing may be done to ensure complete smoothness all along the margin, marking the center of flexing line and find two adjacent cleats that are as close as possible to the center of flexing line. Mark the sole midway between these cleats, bring the Bennewart flexor at the neutral flex position and clamp the test piece in such a manner that the flexing line is parallel with the central roller. Bring the machine to maximum stretched state by hand and make an incision at the point marked with the piercing tool, measuring the initial length of the cut using vernier calipers and magnifying glass, carrying out 30,000 flexes. After completion of 30,000 flexes measure the length of the cut in the same manner. On completion of the test, the testing device should not be left at the fully flexed position. Cut growth = Final cut length (mm) - Initial cut length (mm).
This test measures the force required to separate the upper (10 mm length range) from the outsole or to separate adjacent layers (10 mm length range) of the outsole or to cause tear failure of the upper or the sole by inserting a hot knife into the adhesive layer is measured in the tensile machine to record load/deformation graph at a jaw separation speed of (100 ± 20) mm/min.
When polyurethane outsoles and soles with an outer layer composed of polyurethane are tested in accordance with the cut growth shall be not greater than 6 mm before 150 000 flex cycles. Cut the test piece from the sole. If the thickness is more than 3 mm, reduce the thickness to 3+/-0.2 mm. Keep the sample in a desiccator containing water and place the test piece on a perforated plate. The test pieces should not come in contact with water directly at any point in time. Close the desiccator lid and keep the desiccator in the oven at 70°C for 7 days. After 7 days, take out the test piece and condition at 23°C for 24 hours. After 24 hours, perform the ross flex test maintaining the temperature at -5°C and measuring an initial length of the cut and then performing 1500 cycles and again measuring the final cut length. Cut growth = Final cut length (mm) – Initial cut length (mm).
The steps include: Cleaning the surface of the sole with ethanol, wash with distilled water on dry basis whereas followed by applying conductive lacquer on wet basis and dried at room temperature without buff or abrade the surface, conditioning at 20+/2°C and 30%+/-5% RH for 7 days in the climate chamber, filling with 4 kg of steel balls. If the height of the upper is not sufficient to hold 4kg balls, place the knee boot insulating upper in the shoe to extend the height of the upper, placing the filled specimen on the copper plate. Apply a test voltage of 100V (±2) for 1 minute and record the resistance.
¾ in a dry atmosphere, the electrical resistance shall be above 100 Kohm and less than or equal to 1000 Mohm. ¾ in a wet atmosphere, the electrical resistance shall be above 100 Kohm and less than or equal to 1000 Mohm.


